K53 car controls & the defensive driving method
Understanding the K53 car controls & the defensive driving method lays a solid foundation for how to manoeuvre a vehicle correctly.
The K53 car controls
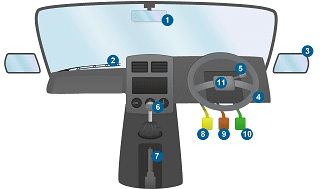
Study the K53 car control diagram below and then read through each description for the K53 car controls & the defensive driving method. When you ready, test your knowledge.

1. Rear-view mirror
This K53 car control is used for observing objects behind a vehicle.
2. Windscreen wipers
Windscreen wipers are used in rainy weather to keep the windshield clear or for cleaning the windshield.
3. Side mirrors
Use side mirrors for visibility of objects on either the left or right-hand side of the vehicle.
4. Steering wheel
Turns a vehicle in the direction in which it should go.
5. Indicator lever
Indicates an intention to move a vehicle in either a left or right direction.
6. Gear lever
Change gears into a higher gear, a lower gear, or reverse by using the gear lever. Use the gear lever in conjunction with the clutch.
7. Handbrake
Fully engage the handbrake control when a vehicle is stationary and parked on a decline.
8. Clutch
Fully engage the clutch to change the gear lever into a lower gear, a higher gear or reverse.
9. Brake
Make use of the brake control to slow a vehicle down or bring a vehicle to a complete stop.
10. Accelerator
Engage the accelerator control to provide a vehicle with the power to move the car forward or backwards.
11. Hooter
Use the hooter to warn other pedestrians or drivers that a vehicle is nearby. Using the hooter can help avoid a collision.
The K53 defensive driving method
K53 is a method of driving called ‘defensive driving’. It was designed to keep all road users safe and is essential to know and understand.
The defensive driving method explained.
1. Search
Be constantly looking in all directions for any potentially dangerous or hazardous condition. A hazard is anything that has the potential of causing a driver to change direction or speed suddenly.
2. Identify
Identify hazards on the road that may affect behaviour while driving. For example, keep a lookout for road repairs taking place.
3. Predict
Predict what may happen as a result of a hazardous condition, and be prepared to respond accordingly.
4. Decide
Decide on an appropriate response to the hazard that will ensure the safety of all road users.
5. Safety first
Keep a safe following distance of at least two seconds, on a dry road, between two vehicles. Increase the following distance when:
- Visibility is poor
- Being tailgated (a vehicle behind you that is too close to you)
- The road is wet
- A car is heavily loaded
The defensive driving method in practice
1. First
When signalling to move into another lane:
Observe 360º
Look to the front, left, right, and relevant mirrors to ensure it is safe all around the vehicle before signalling.
Check the blind spots.
Look over the relevant shoulder to make sure that it is safe in the ‘blind spot’.
Signal the intention to move
Use the indicator lever (see K53 car controls) to signal an intention to other road users that a vehicle is about to change lanes.
2. Second
When braking and changing gears to move into the next lane:
Observe again
Having signalled, use the mirrors to view all around the vehicle that it is still safe to move into the next lane.
Apply the brakes
Gently apply the brakes to reduce speed, if necessary.
Use the gears
Select the appropriate gear if needed.
3. Third
Lastly, when moving into the next lane:
Check the blind spots again
Look over the relevant shoulder again to make sure it is still safe.
Steer
If it is safe to do so, steer in the direction the vehicle needs to go.
Accelerate
If necessary, increase speed and recheck the mirrors to make sure it is safe behind the vehicle.
